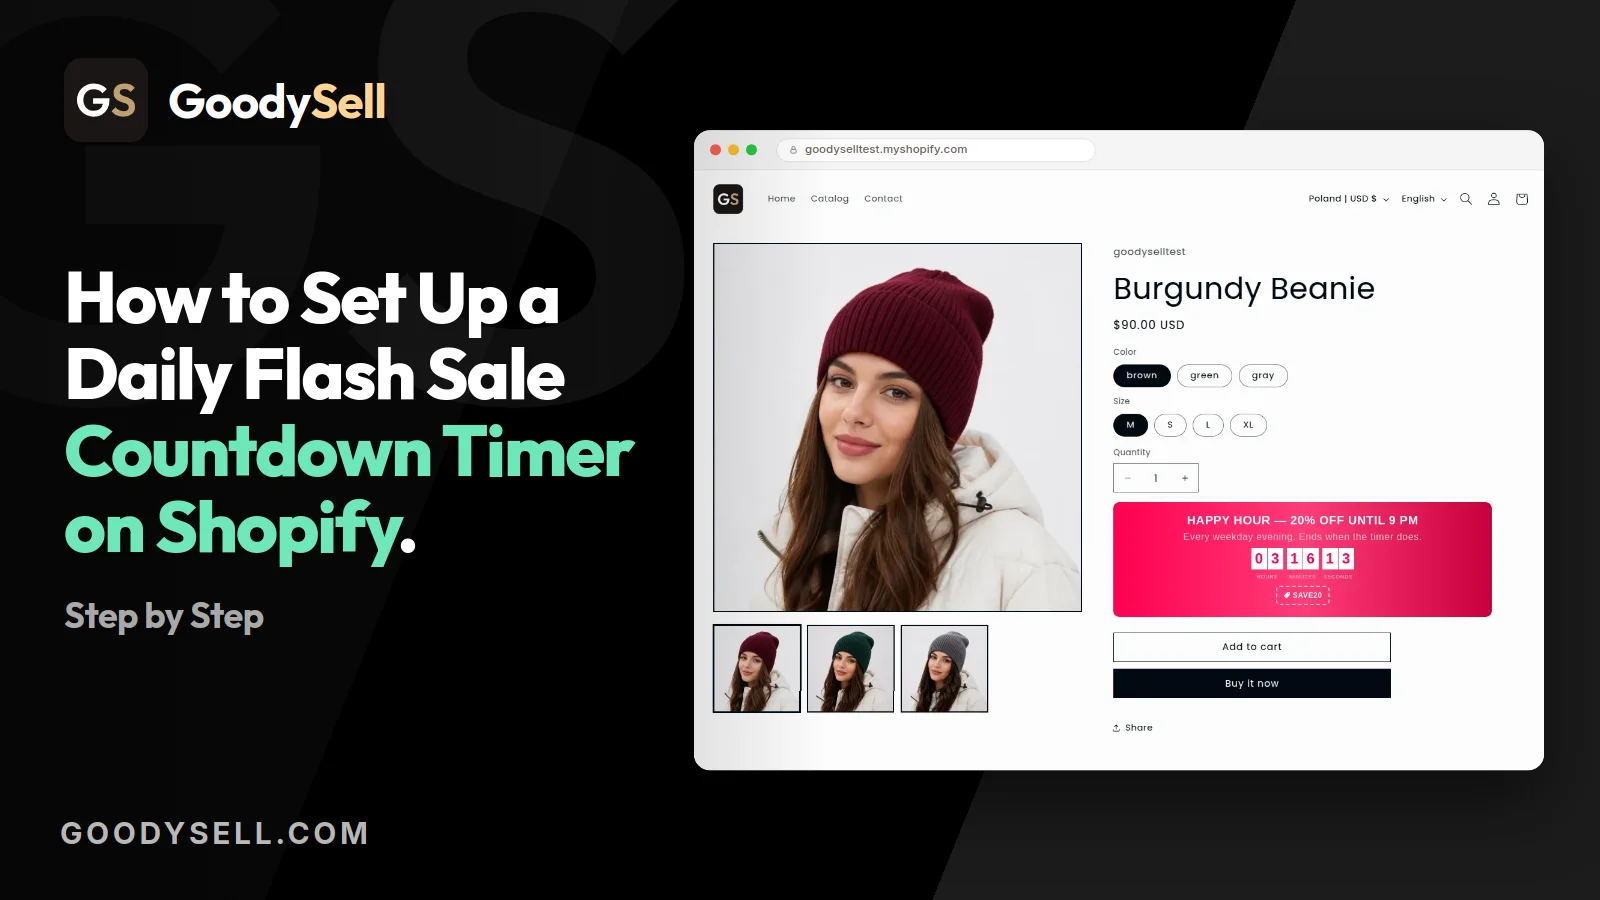
How to Set Up a Daily Flash Sale Countdown Timer on Shopify
Your theme's announcement bar shows one message, everywhere, until you delete it by hand. Here's how to add one that knows which page it's on, when to appear and when to stop — in about ten minutes, without touching theme code.
The problem with running a sale every day
A daily flash sale is a simple idea: the same offer, the same hours, every day. "20% off, weekdays 6 PM to 9 PM." Customers learn the pattern and come back for it.
Running one is where it falls apart.
You become the timer. Somebody has to put the banner up at 6 PM and take it down at 9 PM. Every day. Forget once and you're advertising a sale that ended three hours ago — which teaches shoppers that your deadlines don't mean anything.
A normal countdown timer doesn't repeat. Most timers count down to one date and then stop. To run the same sale tomorrow you'd have to open the app and change the date. Every day. That's the same chore with extra steps.
Nobody knows the sale is on. If the only sign is a lower price, most shoppers won't notice — they don't know what the old price was. A sale nobody can see isn't a sale, it's a discount.
And urgency needs to be real. A banner that says "hurry" all day long stops meaning anything by Thursday. What creates urgency is a clock that's visibly running out, and a sale that genuinely closes when it does.
So a daily flash sale needs three things: something that appears and disappears on a schedule, that repeats without you, and that shows the time left rather than just shouting.
The fix: a timer that repeats on a schedule
GoodySell Countdown Timer has a mode built for this — Repeats daily on a schedule. You choose the days of the week and the hours, once. From then on:
During your hours, the timer appears and counts down to closing time.
Outside them, the timer hides itself completely — not a frozen "00:00:00", not a stale banner. It's simply not on the page.
The next day it comes back on its own.
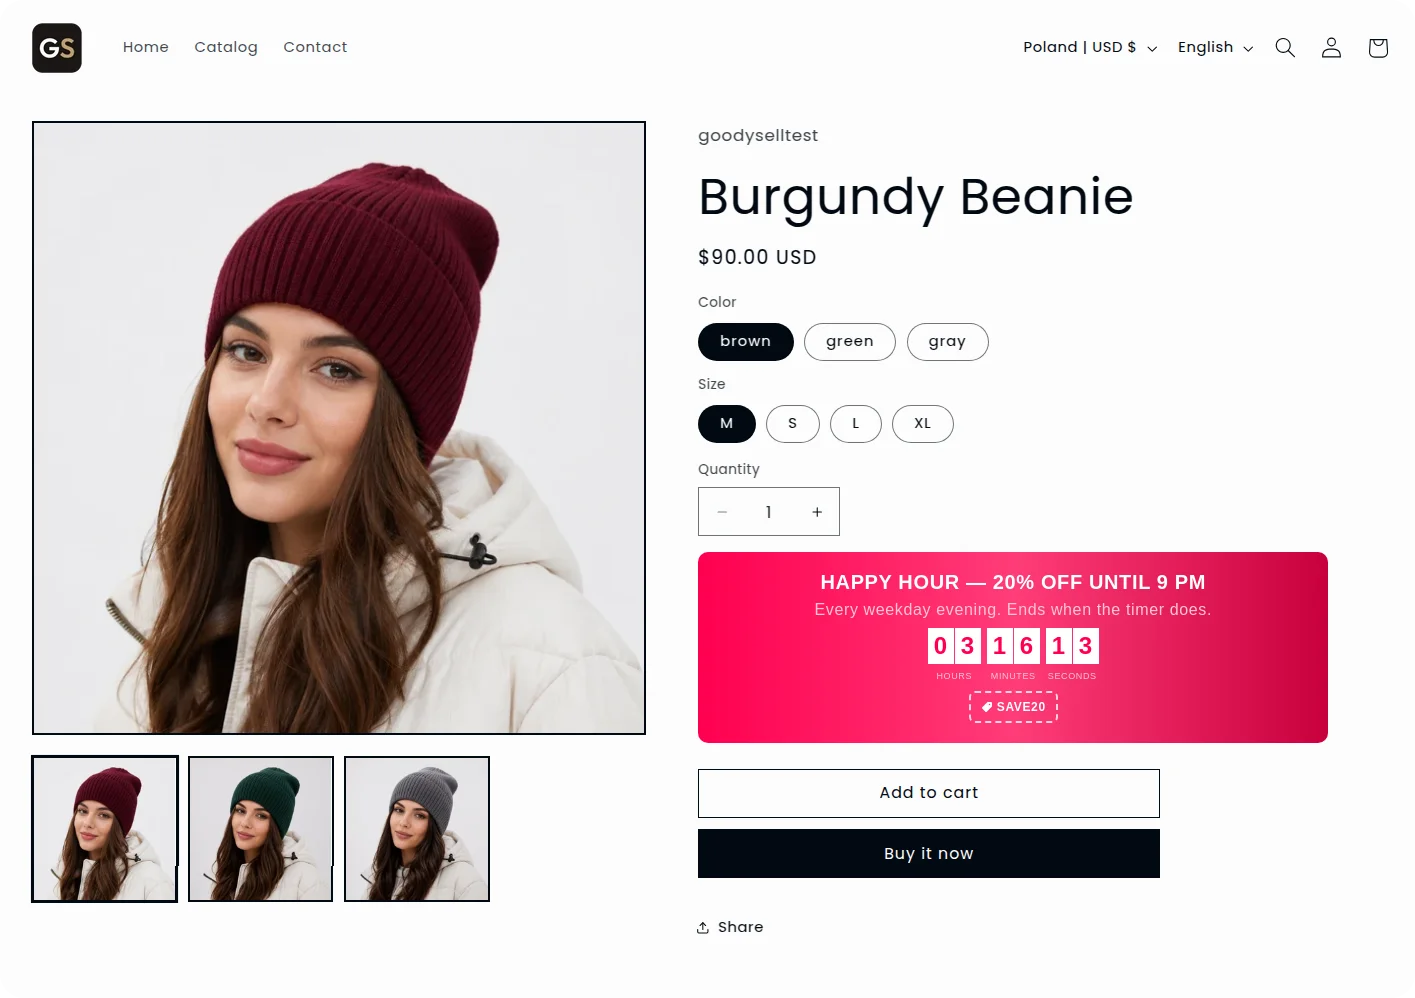
That last point is the one worth reading twice, because it's what removes you from the loop. On a Tuesday at 5:59 PM your product pages look normal. At 6 PM the countdown is there. At 9 PM it's gone. You did nothing.
One honest thing before you start
The timer shows the deadline. It does not change your prices. No countdown app does — prices live in Shopify, not in a banner.
So decide now how the offer itself works. Three options that actually hold together:
A discount code shown on the timer. A discount code is a word the shopper types at checkout to get money off. You don't create it in the timer app — you create it in your Shopify admin, under Discounts in the left-hand menu, where you decide what it takes off (say 20%) and name it something short like
HAPPY20. The app's only job is to display it, on the card it calls Coupon, during your hours. The code itself keeps working outside your hours: Shopify can limit a code to a start and end time, but only as one single window — there's no daily repeat, so keeping it in step with the timer would mean editing those dates every day. In practice the offer lives and dies with what the shopper is shown, and outside your window nobody is shown the code. This is the simplest honest version.A deadline that isn't about price at all. "Order in the next 2 hours for same-day dispatch" is a real daily deadline and needs no discount machinery whatsoever.
A scheduled discount, if you already use an app that turns prices up and down on a schedule. Then the timer just tells people about it.
What doesn't work is a permanent sale price with a daily timer over it. Shoppers who visit twice notice the "sale" price never changes, and the timer becomes decoration.
Before you start: turn on the app embed
One switch has to be on before any timer can show up on your store.
An app embed is Shopify's way of letting an app add something to every page of your storefront. It's a single on/off toggle in your theme settings — you're not editing any code, and turning it off later removes the app's code just as cleanly.
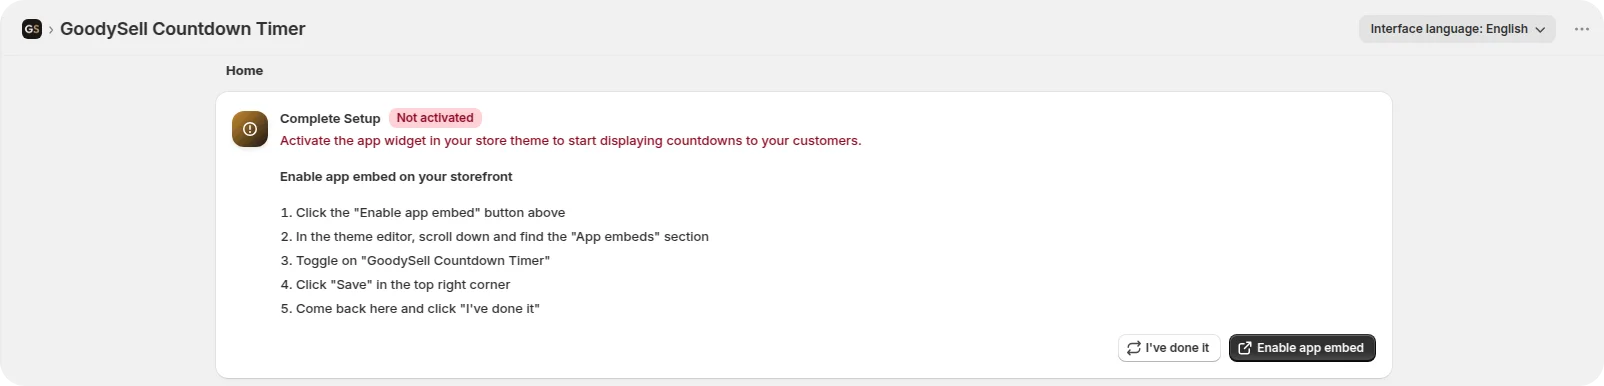
The app's Home tab tells you where you stand. Until that switch is on, the first card reads Complete Setup with a red Not activated badge, and lists exactly what to do:
Click Enable app embed. Your theme editor opens in a new browser tab — the app stays open in the old one.
In the theme editor, scroll down to the App embeds section.
Toggle on GoodySell Countdown Timer.
Click Save, top right.
Switch back to the app's tab and click I've done it.
Don't skip step five. The app doesn't watch your theme in the background — clicking I've done it is what makes it look again. When it does, the card turns into Widget Activated with a green Active badge, and the instructions disappear.
If it still says Not activated after you've clicked it, the toggle didn't save. Go back to the theme editor and check that you pressed Save.
Later on, inside the timer editor, you may also meet a second version of the same warning — "App embed is off — this timer will not show", sitting at the bottom of the preview with its own Turn on app embed button. Same job, shown where you happen to be standing.
Step 1: Create the timer and choose where it goes
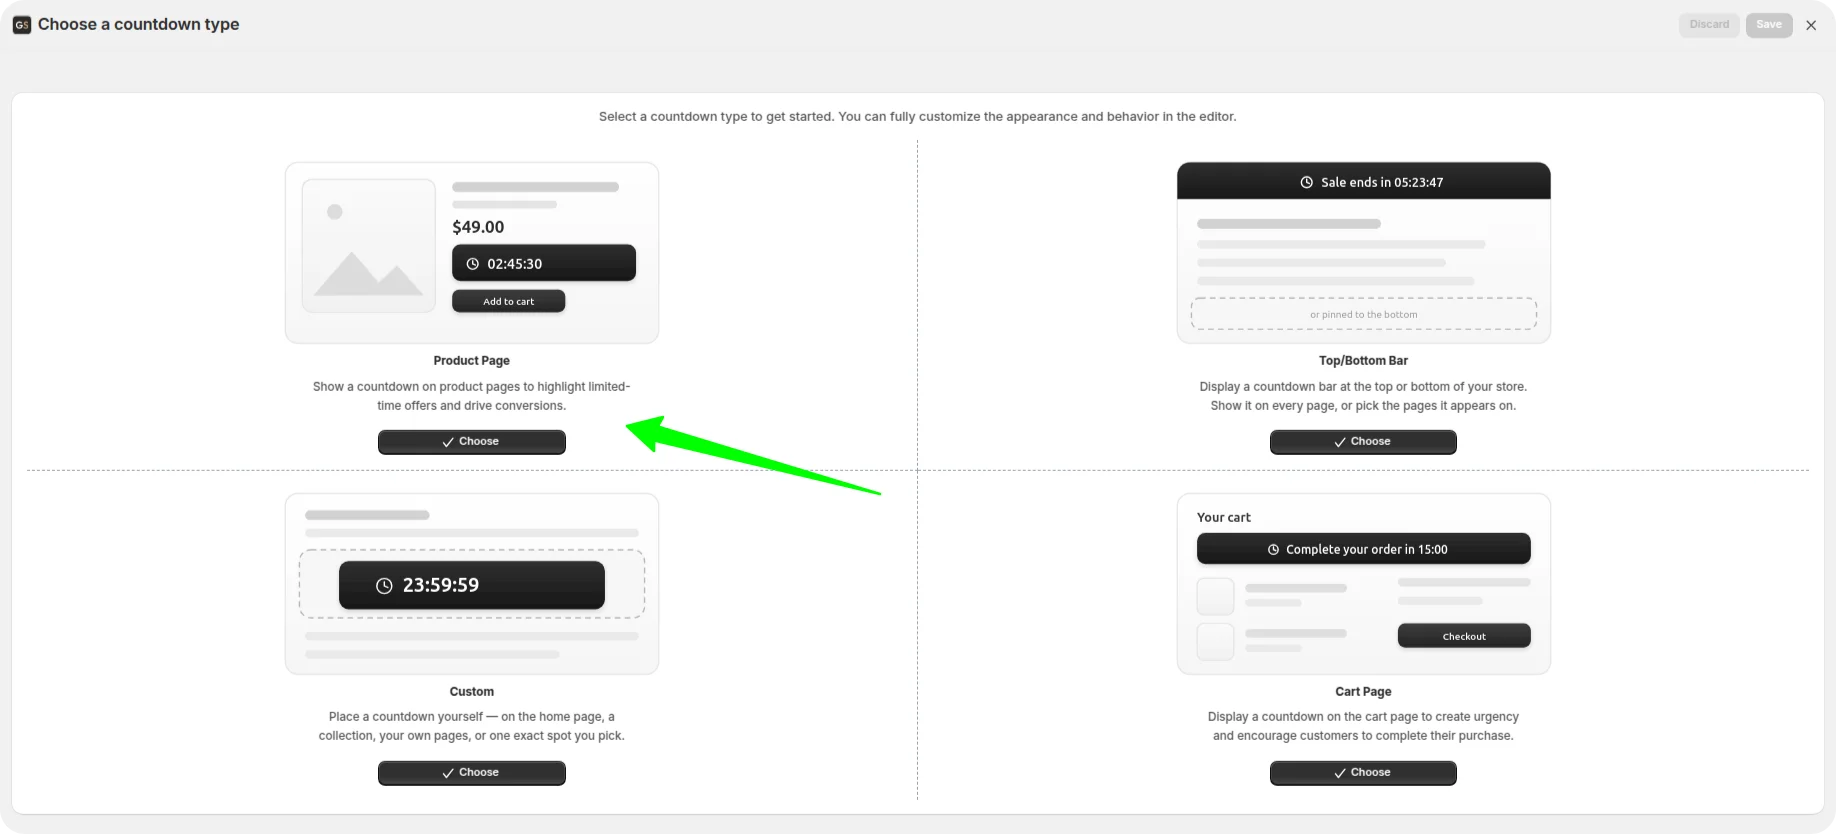
Create a new countdown. You'll be asked where it should appear, with four choices. For a daily flash sale, two of them make sense:
Top/Bottom Bar — a strip across the top of every page. Best when the sale covers your whole store, because shoppers see it wherever they land.
Product Page — a block on product pages only. Best when the sale is for particular products.
Cart Page can't run a daily schedule at all — its timer works per shopper rather than by the clock. Custom can, but it exists for placing the timer somewhere unusual, which is a job for another day. Pick one of the two above.
Give the timer a name — only you see it, so name it after the sale: "Happy hour 6–9 PM".
Step 2: Pick a look before you change anything
The editor has your settings on the left and a live Preview on the right, showing exactly what shoppers will see. Everything you change appears there immediately.
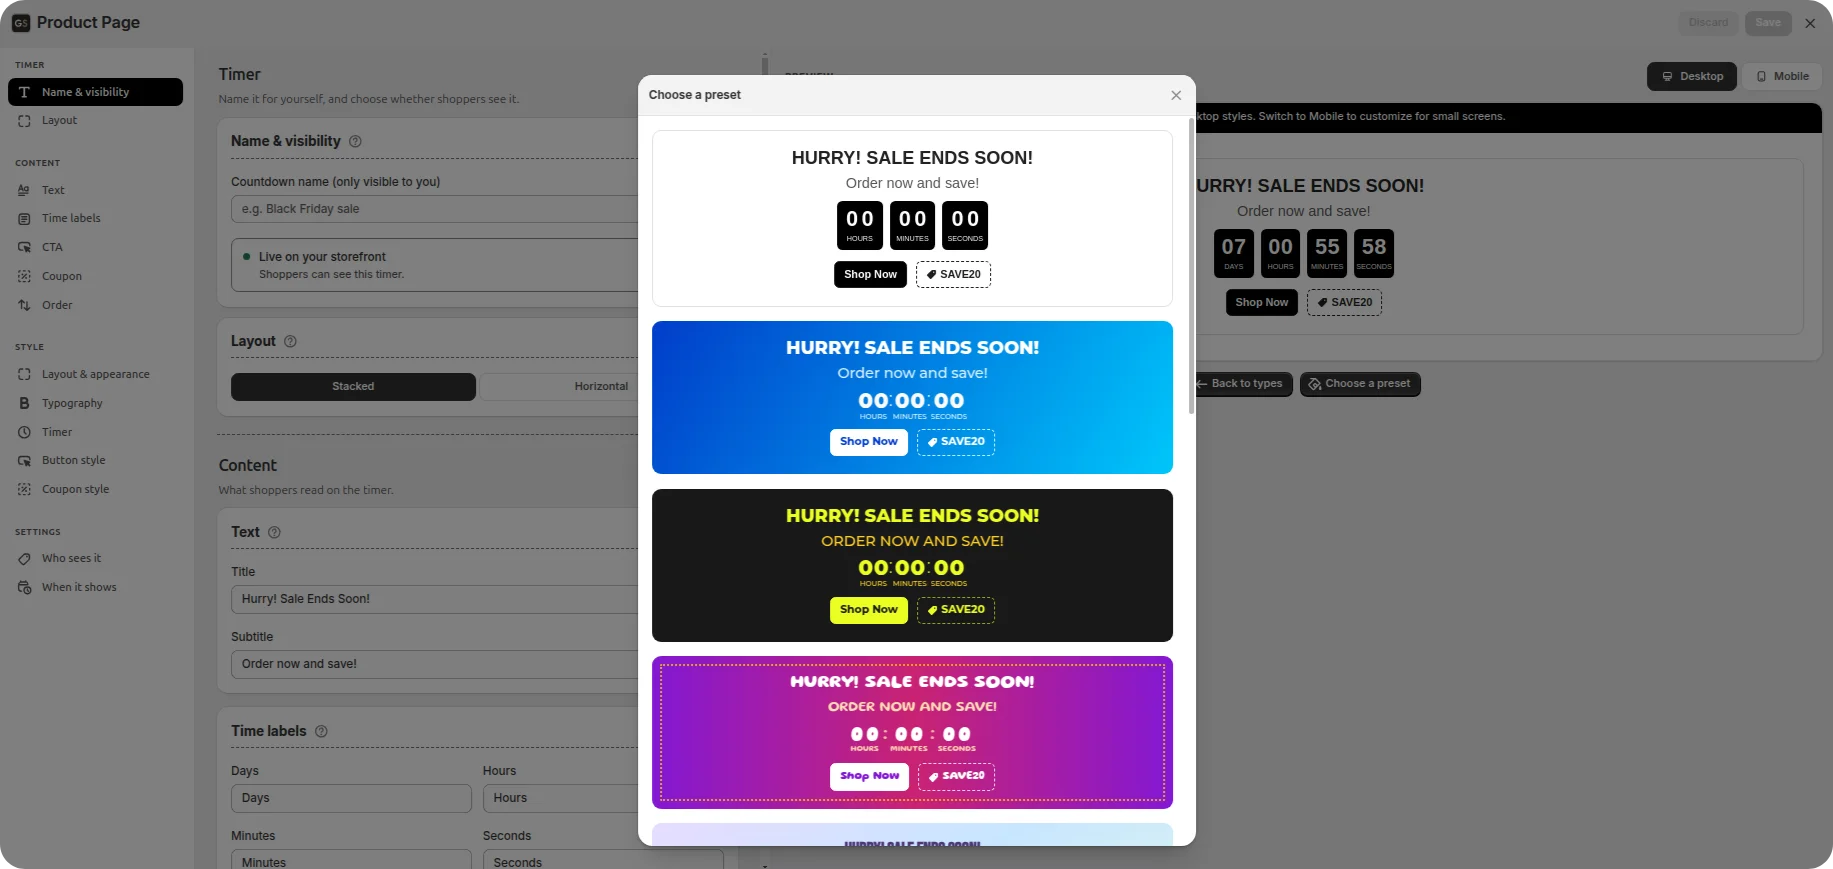
Under the preview is Choose a preset: pick one of the ready-made designs and it's applied in one click. Start here. A preset only changes colours and styling — it never touches your text — so picking one now means the only things left to decide are what the timer says and when it runs.
Step 3: Write text that fits a daily deal
On the Content tab, the Text card holds the Title and Subtitle.
Daily sales need different wording from one-off sales, because the shopper might be seeing it for the tenth time. Name the window, don't just shout:
Title:
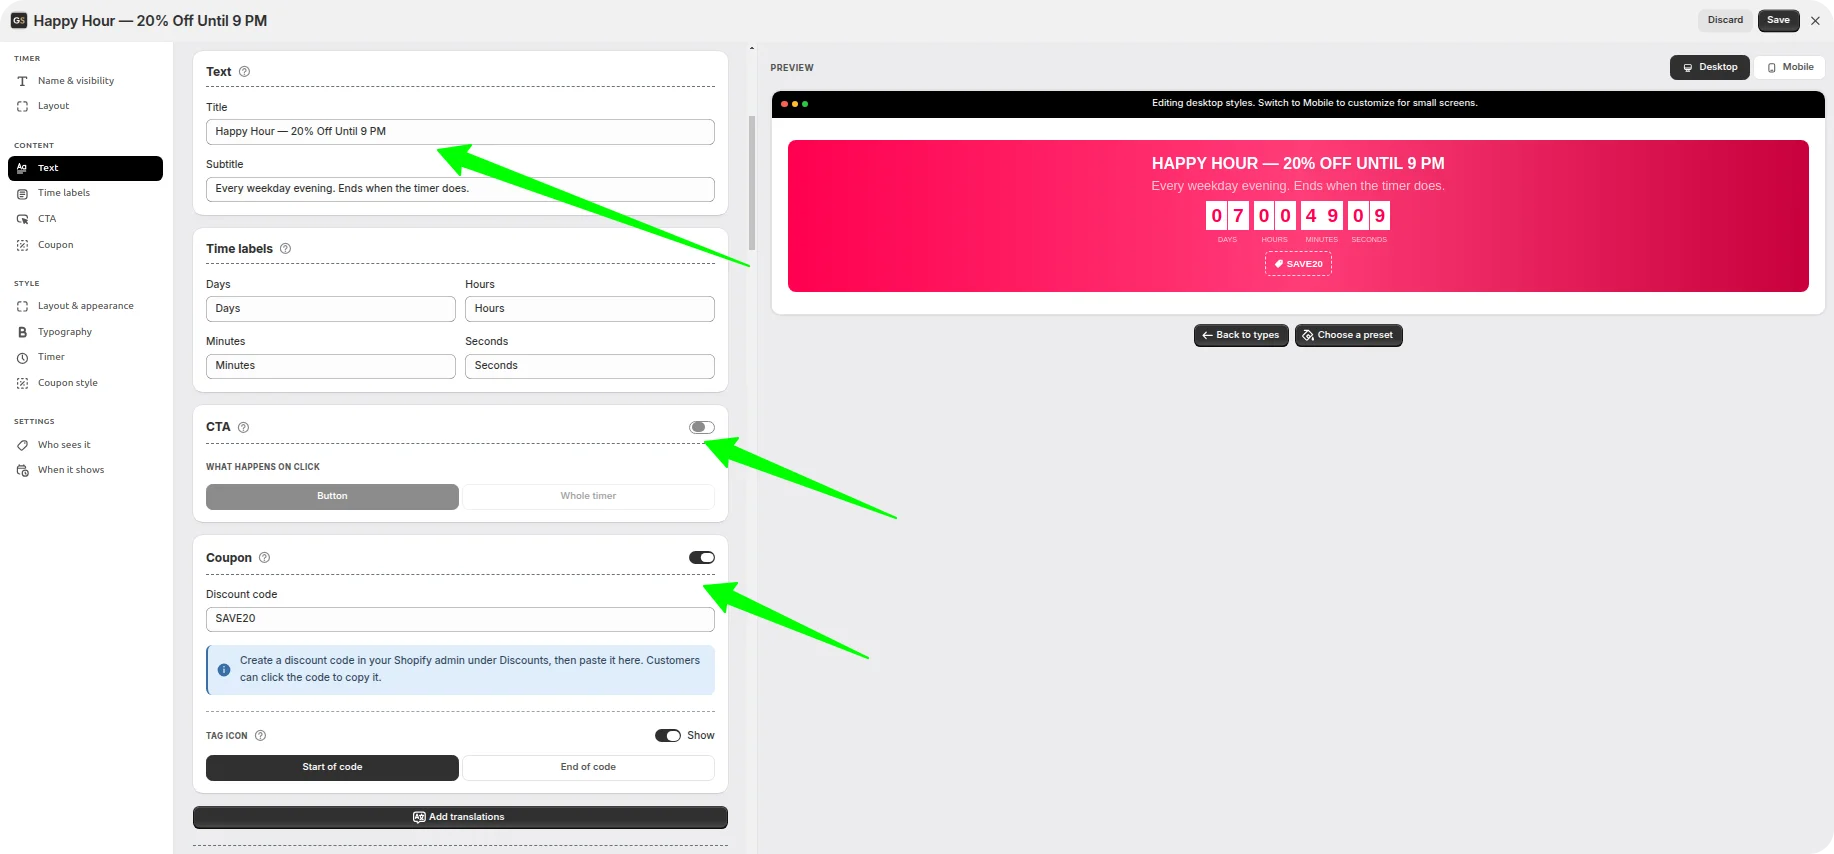
Happy Hour — 20% Off Until 9 PMSubtitle:
Every weekday evening. Ends when the timer does.
Saying "every weekday evening" out loud is deliberate. It turns a one-time nudge into a habit worth remembering, which is the entire point of running the same sale daily.
If you're using a discount code, turn on the Coupon card — it has a switch in its header — and paste the code you created in your Shopify admin into the Discount code field. Shoppers tap the code and it copies itself, so nobody mistypes it.
Leave the CTA card's switch off unless the timer genuinely needs to link somewhere.
A CTA is the link the timer carries — either a button like "Shop now", or the whole timer made clickable — sending the shopper to another page.
On a product page, a link pointing elsewhere competes with your Add to cart.
Step 4: Set the daily schedule
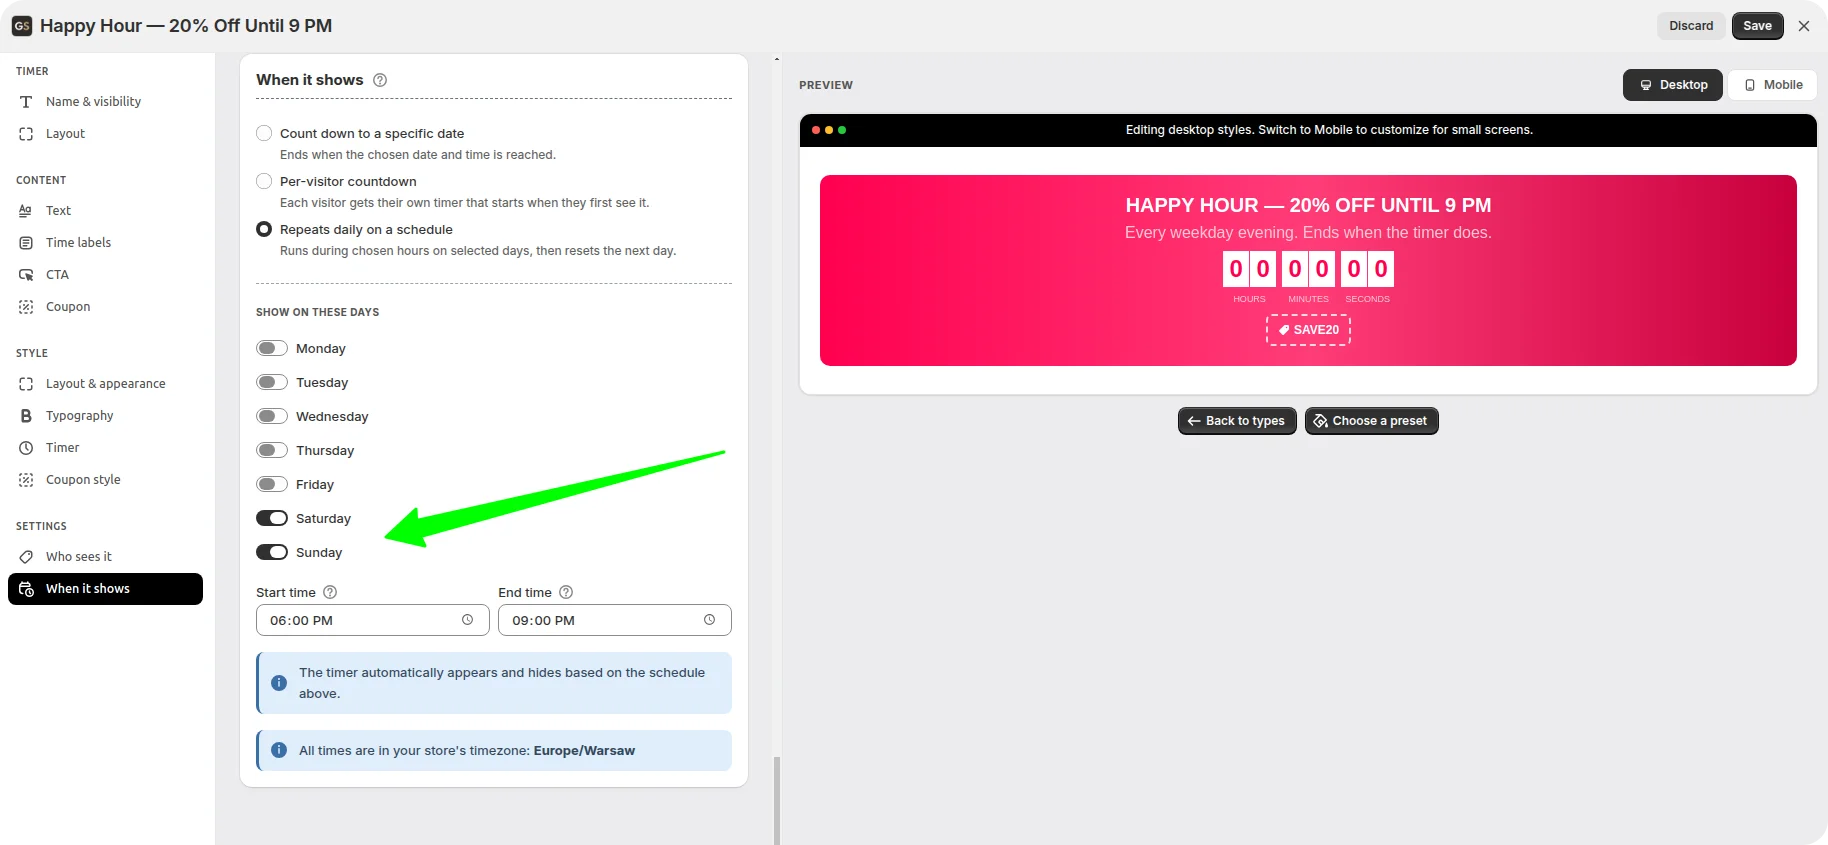
This is the step that does the actual work. Go to Settings → When it shows and choose Repeats daily on a schedule.
Three fields appear.
Show on these days. Switch on the days the sale runs. Weekdays only, weekends only, or all seven — whatever your pattern is. On the days you leave off, the timer never appears at all.
Start time and End time. The hours the sale runs each day — say 6 PM until 9 PM.
These fields are your browser's own clock picker, so they don't look the same on every computer. Most people see an AM/PM clock — 6:00 PM — while some, depending on their computer's language settings, see a 24-hour clock showing the same moment as 18:00. It's the browser deciding, not the app, and the timer behaves identically either way. This guide writes every time as AM/PM.
Under the fields the app shows your store's timezone, and every time you type is read in it.
A timezone is simply which clock your store runs on — the one set in your Shopify settings. It matters because if your store is set to New York time and you're typing from Melbourne, 6 PM means 6 PM in New York, not where you're sitting.
Below that sits a note confirming what will happen: "The timer automatically appears and hides based on the schedule above."
Two things this mode does differently
There's no "when time runs out" setting. Other timer modes ask what should happen at zero. This one doesn't, because the answer is already fixed: the timer hides, and comes back tomorrow. If you go looking for that setting and can't find it, that's why.
The window can't cross midnight. Start time and end time belong to the same day, so a window running from 10 PM until 2 AM isn't possible in one timer. Watch this one, because nothing stops you typing it: the app doesn't flag an end time that isn't later than the start, and a window like that simply never opens — the timer stays invisible all day, every day, with no error to tell you why.
If you want a late-night window, make two timers: the first running 10 PM to 11:59 PM, the second midnight to 2 AM. Give them the same design and text, and shoppers see one continuous sale.
Step 5: Choose who sees it
Still under Settings, open Who sees it.
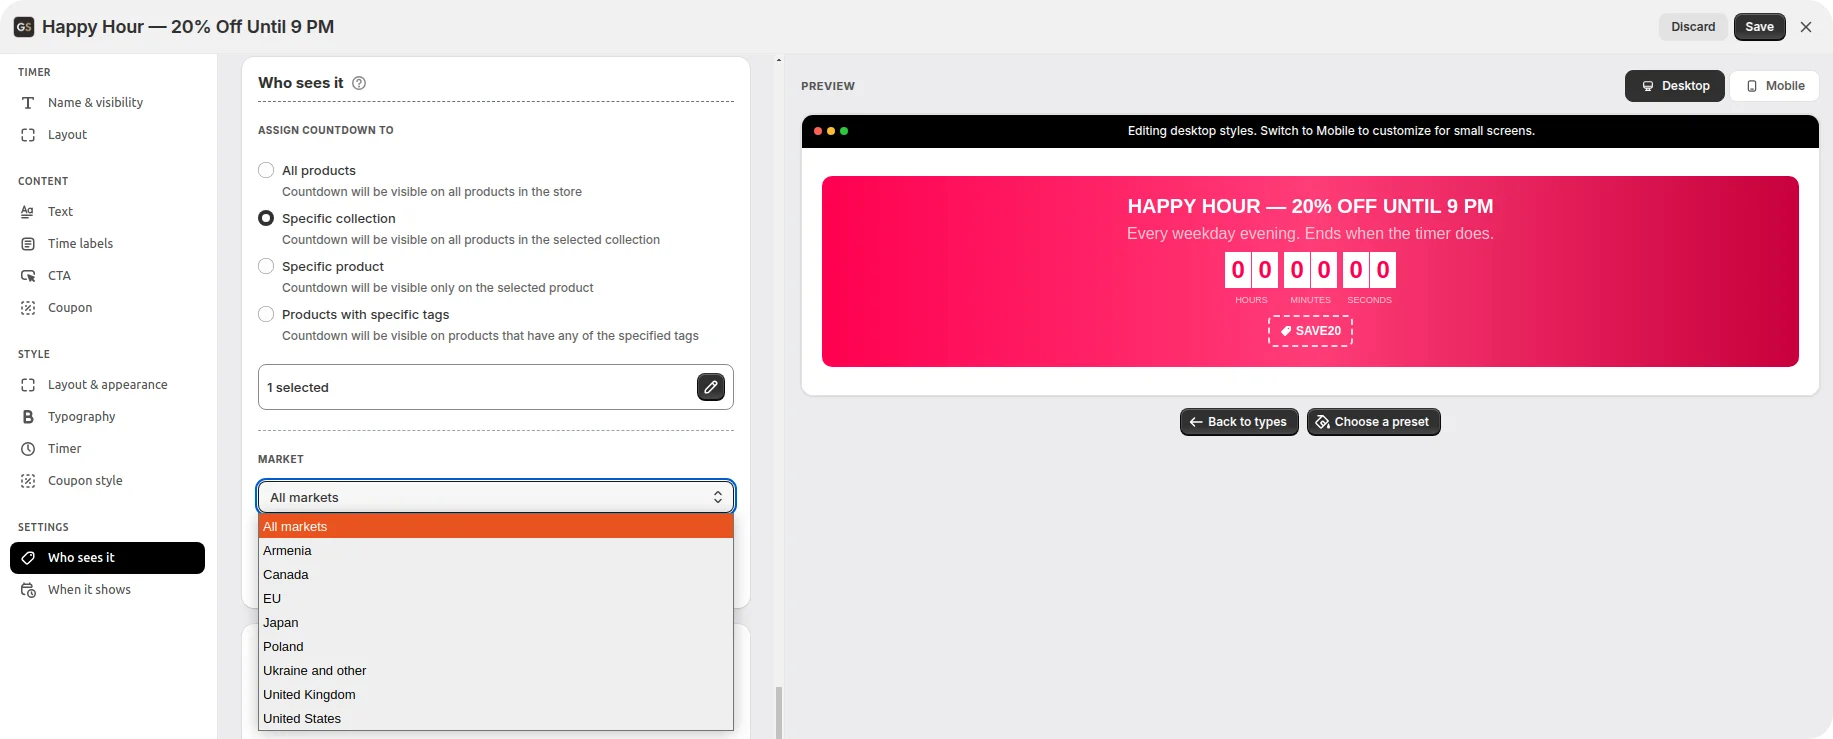
For a product page timer you pick which products it runs on: all of them, one collection, one specific product, or everything carrying a particular tag.
A collection is a group of products you've already made in Shopify — "Summer", "Sale", "Mugs". If your sale matches a group you already have, point the timer at it.
A tag is just a label you stick on a product inside Shopify — like happyhour. A product can have several. The useful part: point the timer at a tag, and from then on adding that tag to a product puts it in the sale, while removing the tag takes it out. You never open the timer again.
A Top/Bottom Bar timer gets those same four product rules — all products, one collection, one product, or a tag — plus two of its own, because a bar isn't tied to product pages. All pages runs it everywhere in the store. Specific pages lets you tick exactly which page types it appears on: Home, product pages, collection pages, your own pages (About, Contact, FAQ), blog pages, blog posts, cart, search, the 404 page and the password page.
Six options in total, then. Which means a store-wide happy hour and a happy hour on one collection are both a bar's job — you don't have to switch to a Product Page timer just to narrow the sale down.
There's also a Market setting on the same card. Markets are Shopify's grouping of the countries you sell to. Leave it on All markets unless the happy hour is for one region — which, with timezones in play, is worth thinking about: 6 PM in Germany is lunchtime in Chicago.
Step 6: Put it on your store
A bar timer needs nothing else — the app embed you turned on at the start puts it across the top of every page.
A product page timer needs one more move, because you decide exactly where on the page it sits.
Save the timer, then click Add timer to theme. Shopify opens your theme editor on a product page. The theme editor is Shopify's own drag-and-drop screen for arranging your storefront — the one you use to move sections around. No code.
Find the Product information section — the one holding your title, price and Add to cart button. Click Add block inside it and choose GoodySell Countdown Timer. A block is one piece of a page. Your price is a block; your Add to cart button is a block. You're adding one more.
Drag it next to the Add to cart button and save. The app's own instructions suggest placing it just below that button; directly above it works just as well, and some themes read better that way. Either is fine — what matters is that the deadline and the Add to cart button are seen together, without scrolling.
Shopify theme editor adding the countdown timer app block above the add to cart button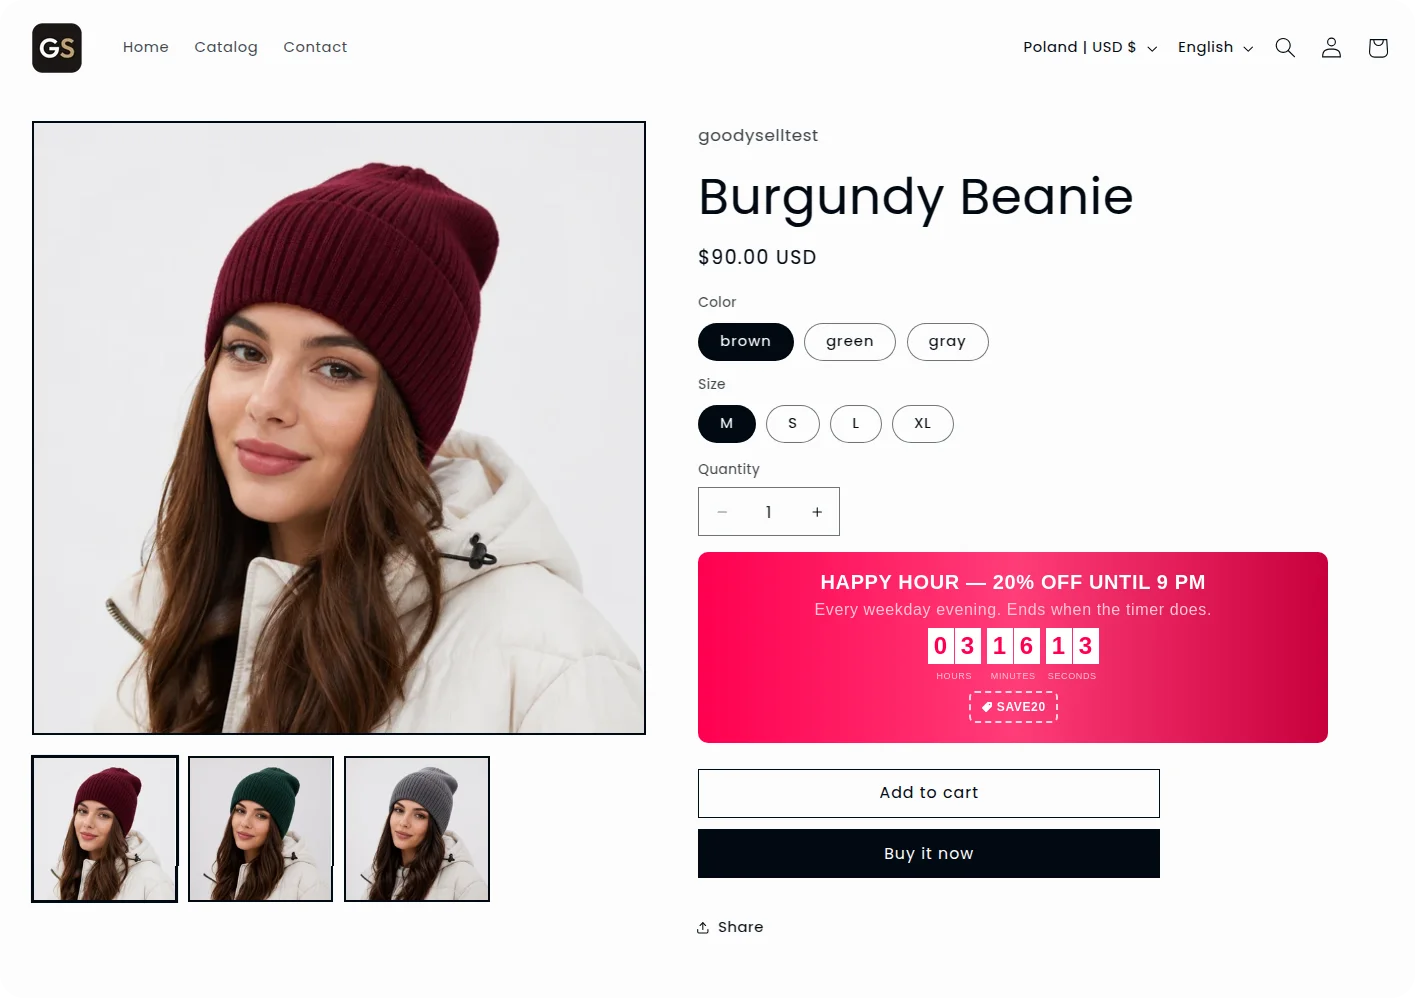
Step 7: Go live, then check it twice
Back in the app, open Name & visibility and switch the timer from draft to Live on your storefront, then save.
Your storefront is the public side of your store — what customers see, as opposed to the admin panel you're working in now.
A draft is saved but invisible to shoppers — useful while you're still setting up.
Now do the check that people skip, and the one that matters most here: look at your store during the window, and again outside it.
Inside the hours — open a page the timer runs on. It should be there, counting down toward your end time.
Outside the hours — open the same page. There should be no timer at all. Not a zeroed one, not an empty gap.
If both are true, the schedule is working and you're done. There is nothing to switch off tonight and nothing to switch back on tomorrow.
Step 8: See whether people care
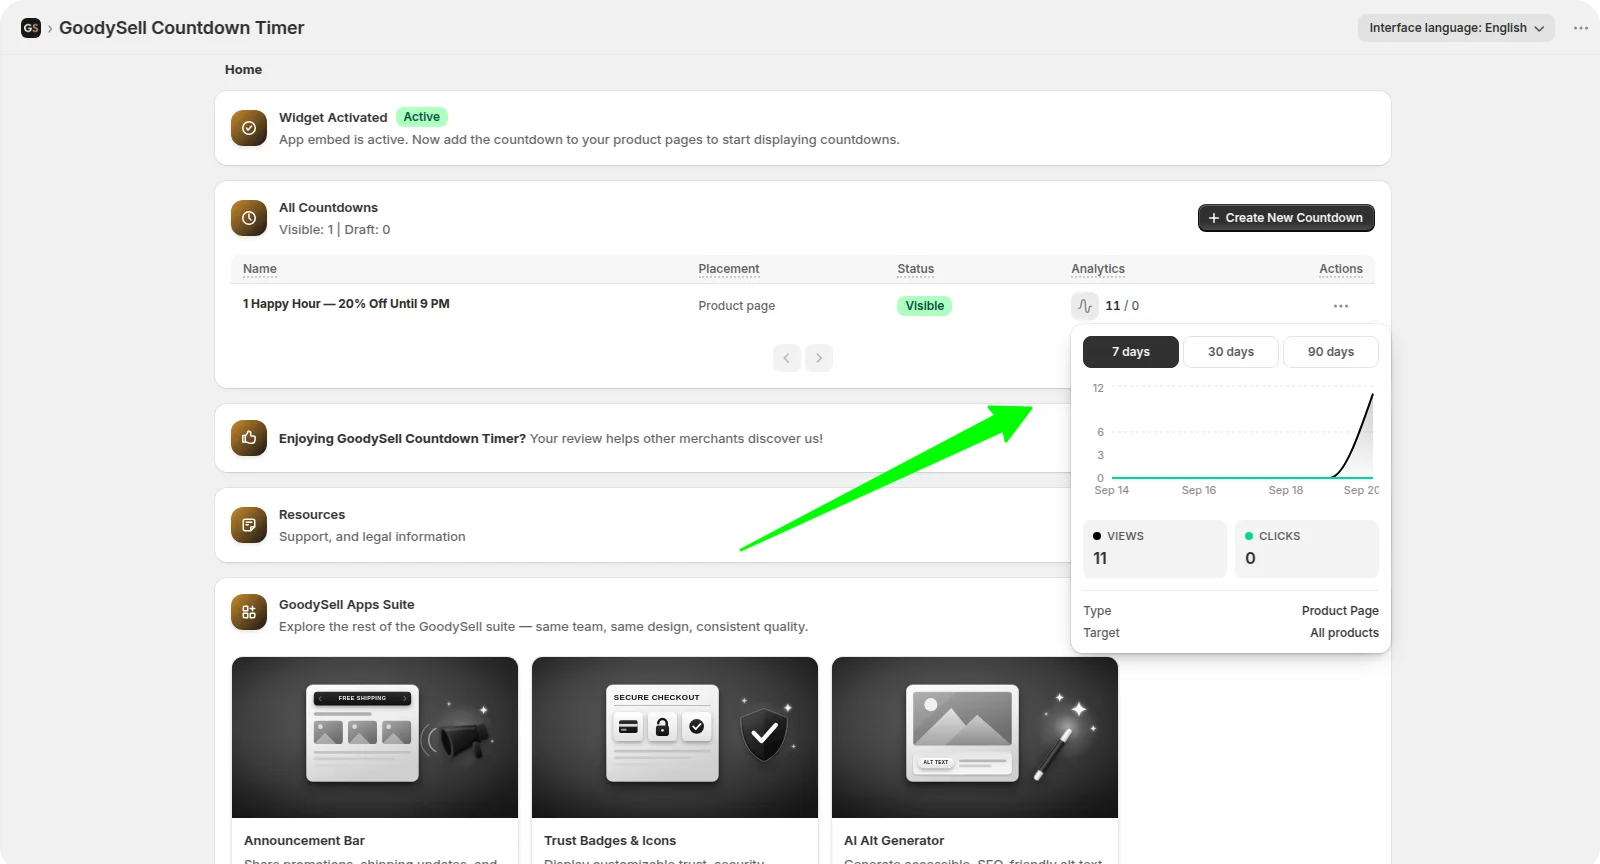
Each timer records views (how many times shoppers saw it) and clicks, charted over the last 7, 30 or 90 days.
For a daily sale these numbers answer a question worth asking: are your hours the right hours? Steady views every evening means people are around when the sale runs. Views that collapse on certain days is your cue to drop those days, or move the window.
Common questions
Do I have to turn the sale on and off each day? No. That's the entire point of this mode. You set the days and hours once, and the timer appears and hides itself.
What do shoppers see outside the sale hours? Nothing. The timer removes itself from the page until the next window opens.
Does the app change my prices during the sale? No. It shows the countdown and, if you want, a discount code. The price itself is Shopify's job — see the options near the top of this guide.
Can I run it from 10 PM to 2 AM? Not in one timer. Both times belong to the same day, so a window whose end isn't later than its start never opens at all — and nothing warns you, the timer just never appears. Use two timers instead, 10 PM to 11:59 PM and midnight to 2 AM, styled identically.
What happens if I'm in a different timezone from my store? Your store's timezone wins, and the app shows it under the time fields. Set the hours you want your customers to see.
Can I run different hours on different days? Not within one timer — one window applies to all the days you tick. For different hours on different days, make one timer per pattern and tick the matching days on each.
Can I use it on the cart page? No. Cart timers work differently — each shopper gets their own clock that starts the moment they first see it, so two people looking at the same cart page see two different countdowns. The daily schedule is for bars, product pages and custom placements.
Will shoppers notice the timer disappearing? Only in a good way. A shopper who arrives at 9:05 PM sees a normal store rather than an expired banner — which is what protects your deadlines from looking fake.
Set it once, let it run
A daily flash sale works because it's a habit — same offer, same hours, dependable. The reason most stores don't run one is that being dependable by hand is exhausting.
Set the days, set the hours, write one honest line of text. The timer handles every evening after that.
Install GoodySell Countdown Timer, run your first happy hour this week, and check the views after seven days to find out whether you picked the right time of day.