How to Generate AI Alt Text for Shopify Images: Complete Guide
Learn how to automatically generate SEO-optimized alt text for all your Shopify product images using AI. This step-by-step guide shows you how to improve your store's search visibility and accessibility in minutes.
Alt text is one of the few SEO jobs that pays off twice: it tells Google what your product photos show, and it tells screen readers what your shoppers can't see. It's also the job nobody finishes, because a store with 500 products and 3 photos each needs 1,500 descriptions.
GoodySell AI Alt Generator writes them for you. This guide walks through the whole flow — scan, select, configure, generate, review, apply — exactly as the app works today.
What alt text is and why it matters for Shopify SEO
Alt text (alternative text) is a short written description attached to an image.
For search. Google can't see your photos. Alt text is the main signal it uses to understand them, and it's what gets your products into Google Images — a traffic source most stores leave completely empty.
For accessibility. Screen readers read alt text aloud. Missing or useless alt text ("IMG_4821", "product image") shuts blind and low-vision shoppers out of your catalog, and WCAG 1.1.1 — the standard most accessibility legislation points at — treats it as a baseline requirement.
The reason stores skip it isn't disagreement. It's volume.
What the app does
Scans your product images and reports which ones have alt text and which don't
Generates descriptive alt text with AI, in 20 languages, in the length you choose
Lets you edit or reject every result before anything touches your store
Writes the text back to Shopify — onto the image for your primary language, and as a Shopify translation for every other language
Works on empty and filled alt text alike — it can describe images that have nothing, or rewrite existing descriptions when they're weak
It works on product media images. Alt text for theme, blog or collection images isn't part of the flow.
Install and first look
Install from the Shopify App Store, then approve the permissions. The app asks to read your products, locales and translations, and to write image files and translations — the write permissions are what let it save alt text back for you.
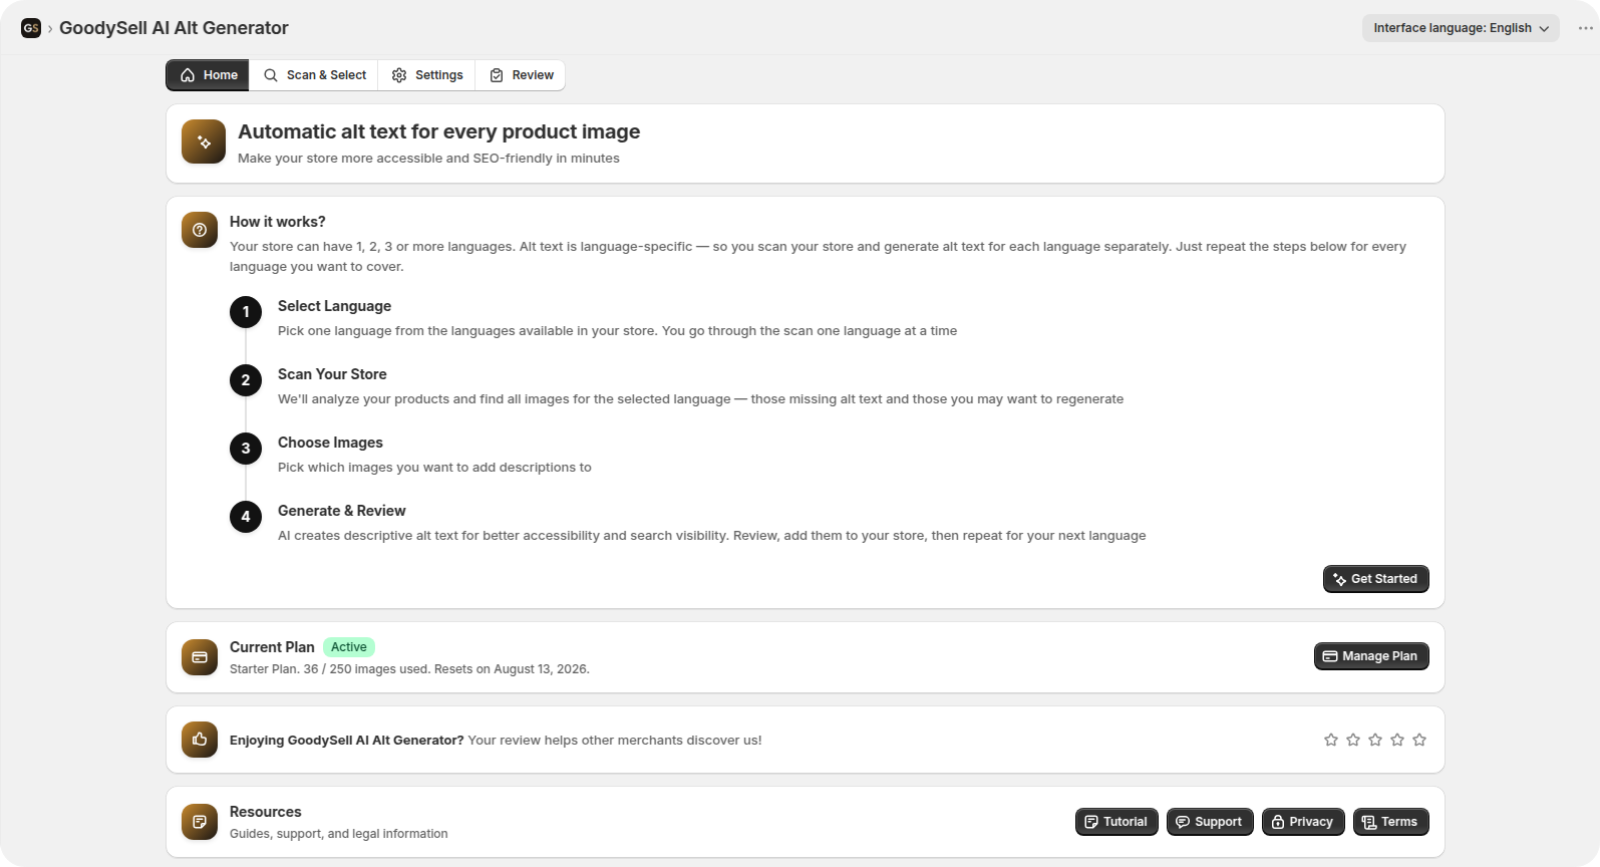
Open it from Apps in your Shopify admin. You work through four tabs, left to right: Home, Scan & Select, Settings, Review. The Home tab lays out the same flow this guide follows, in four steps.
The admin interface itself is available in several languages; switch it with the Interface language menu in the app's title bar. That setting changes the buttons and labels you see — it has nothing to do with the language your alt text is written in, which you choose separately in the next step.
Pick a plan
Your store starts on the free tier automatically, so you can run your first batch straight away — there's nothing to activate first.
Plans are sized by how many images you can process per month, from that free tier for testing up to catalog-sized allowances, with a discount if you pay yearly. Open Pricing from the app navigation when you're ready to move up, and pick the plan that matches the size of your catalog; you can move up later without redoing any work.
The free tier is there for judging quality on a handful of images, not for doing a catalog — its monthly allowance is small by design, enough to see what the AI writes for your own products before you commit to anything.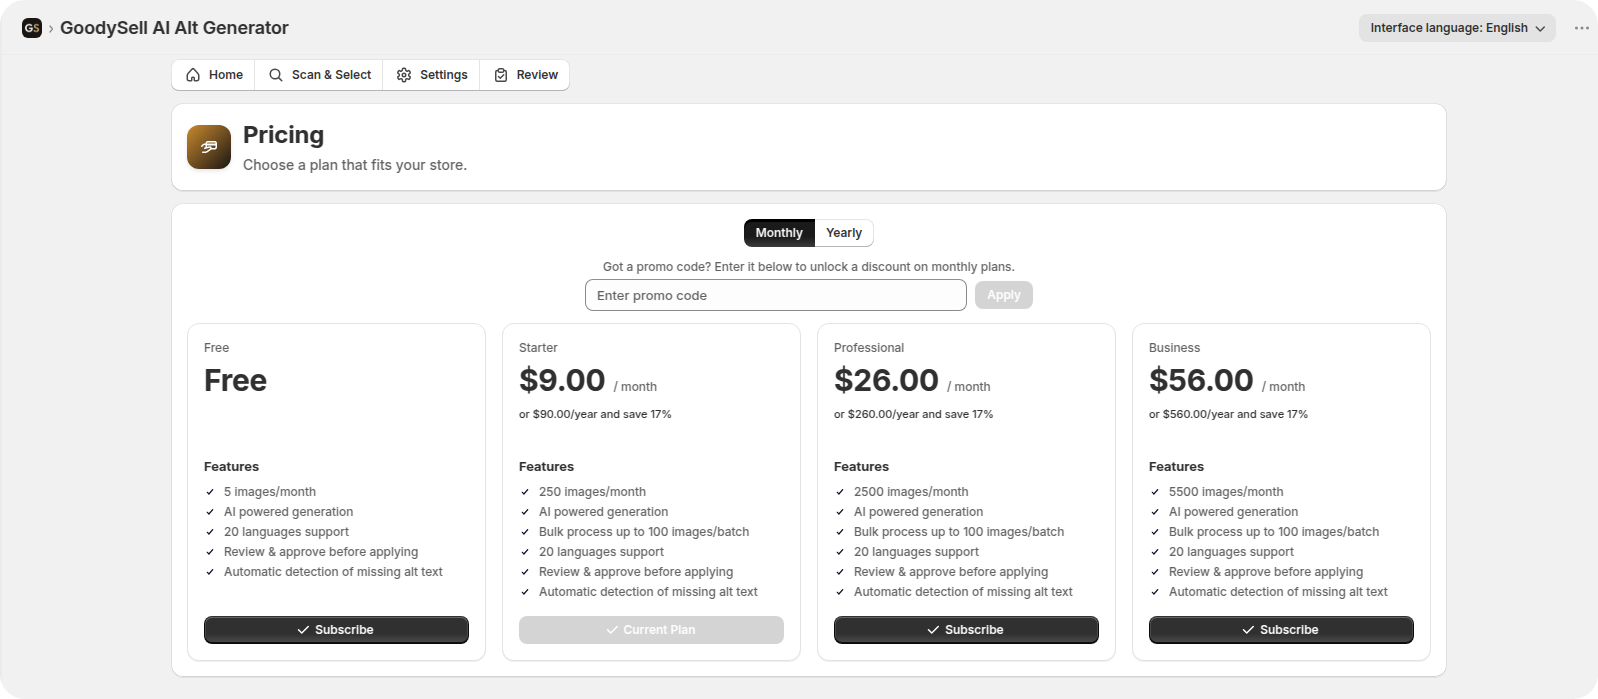
Step 1: Scan your store
Open Scan & Select.
Alt text is language-specific, so the app works one language at a time. At the top, Available Languages lists the languages your store publishes; if one of them isn't supported yet, a warning banner names it.
Choose your language in the Generation language dropdown, then start the scan. The dropdown only offers locales your store actually has — the app can generate in 20 languages in total: English, German, Spanish, French, Italian, Dutch, Portuguese (BR and PT), Polish, Czech, Swedish, Danish, Norwegian, Finnish, Turkish, Malay, Japanese, Korean, and Chinese (Simplified and Traditional).
When the scan finishes you get four numbers:
Total Images
Have Alt Text
Need Alt Text
Accessibility Coverage, as a percentage with a progress bar
That coverage figure is the one to watch month to month. Running the scan again later is a single click on Rescan Images, and the card keeps the timestamp of your last scan. Switch language and scan again, and every number is recalculated for that language — an image can be fully covered in English and completely empty in German.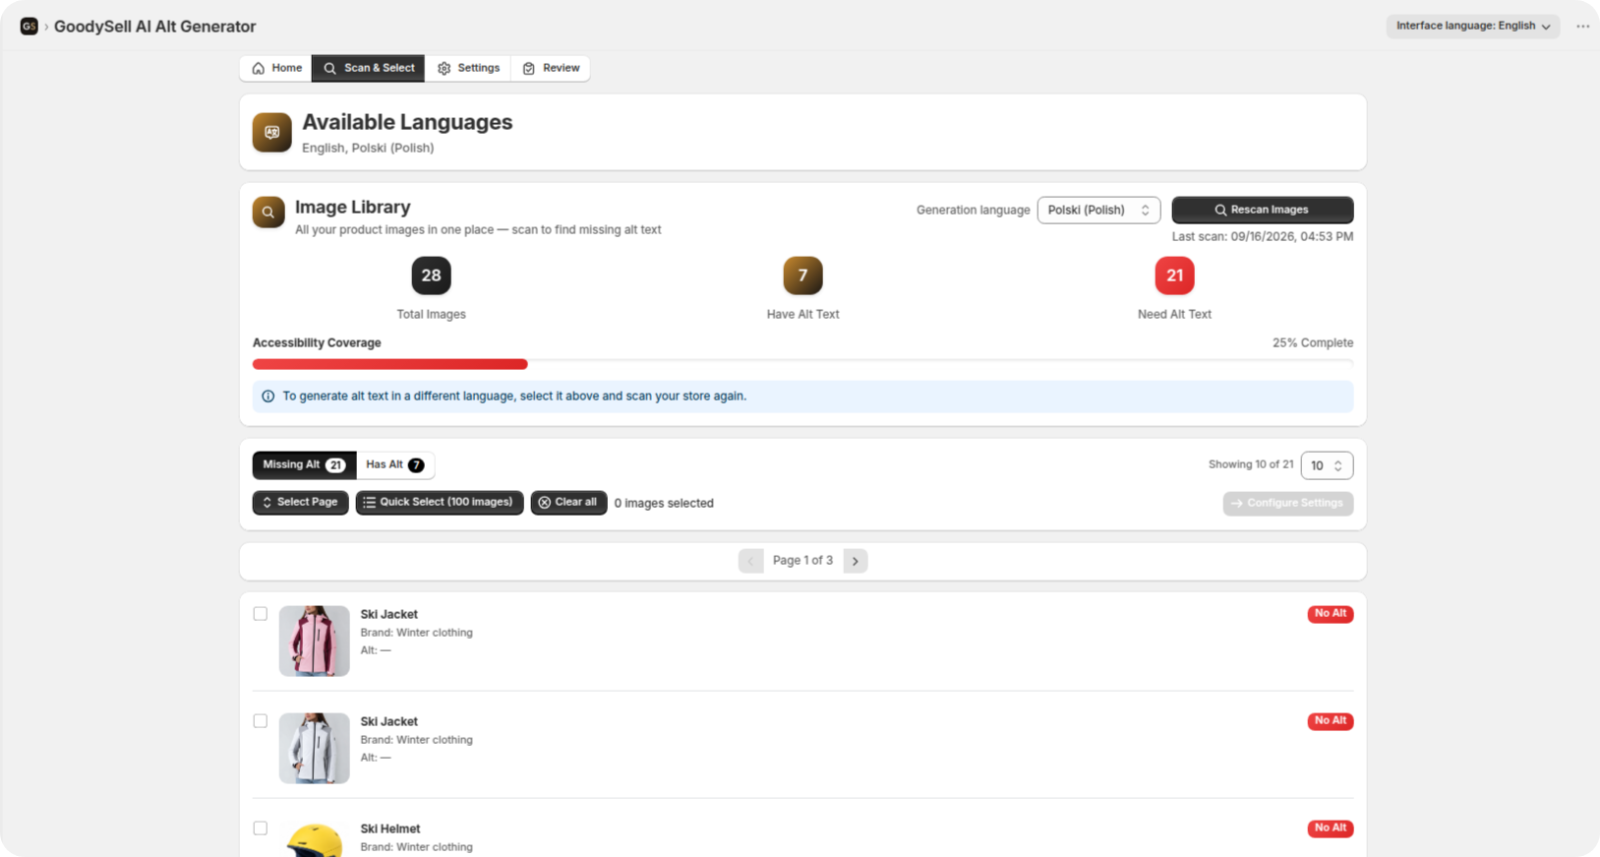
Step 2: Select the images
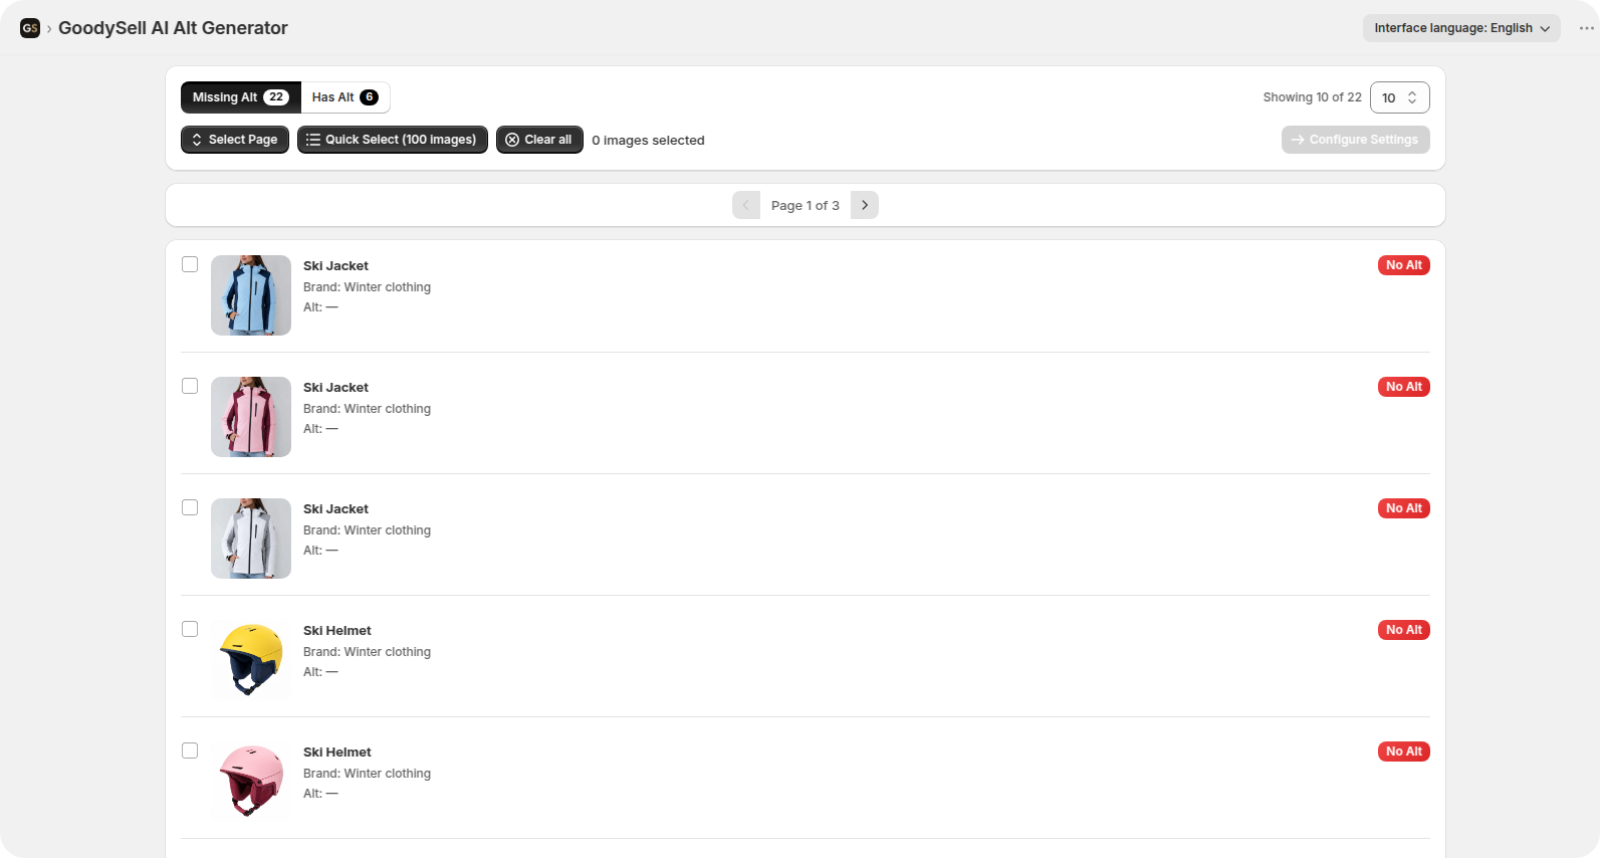
The gallery has two filter tabs:
Missing Alt — the default, and where the wins are
Has Alt — images that already have a description, for when you want to replace weak ones
Select what you want to process:
Control | What it does |
|---|---|
Click a card | Toggles that one image |
Select Page | Selects every image on the current page (page size 10, 20 or 50) |
Quick Select (100 images) | Selects up to 100 matching images at once, across pages |
Clear all | Deselects everything |
One batch is up to 100 images. Larger catalogs simply mean more rounds — the batch limit is enforced on the server, so there's no way to overshoot it by accident.
With your selection made, click Configure Settings.
Regenerating alt text you already have
The app isn't limited to images with no description. Old alt text like "product image", descriptions written before you cared about SEO, or text inherited from a previous store owner can be rewritten the same way it's generated from scratch.
Existing alt text is never replaced by accident: the default filter is Missing Alt, and overwriting happens only for images you deliberately select under the Has Alt tab.
Open Scan & Select and pick your language in the Generation language dropdown.
Click Rescan Images so the statistics match the current state of your store.
Switch to the Has Alt tab — these are the images that already have a description in that language.
Select the ones worth replacing, individually or with Select Page / Quick Select (100 images). Select only what you actually want rewritten: everything selected will be overwritten.
Click Configure Settings. Adjust the maximum length or toggle Include brand name in alt text — this is where you decide how the new text should differ from the old.
Run Generate Alt Text and wait for it to finish.
On the Review tab, compare each result against what you had. Reject anything that isn't an improvement; edit the rest in place.
Click Apply to Store. The new descriptions replace the old ones — on the image itself for your primary language, in Shopify translations for the others.
The previous text isn't kept after a replacement, so if some images carry hand-written descriptions you're happy with, it's easier to leave them out of the batch than to restore them later.
Step 3: Configure the generation
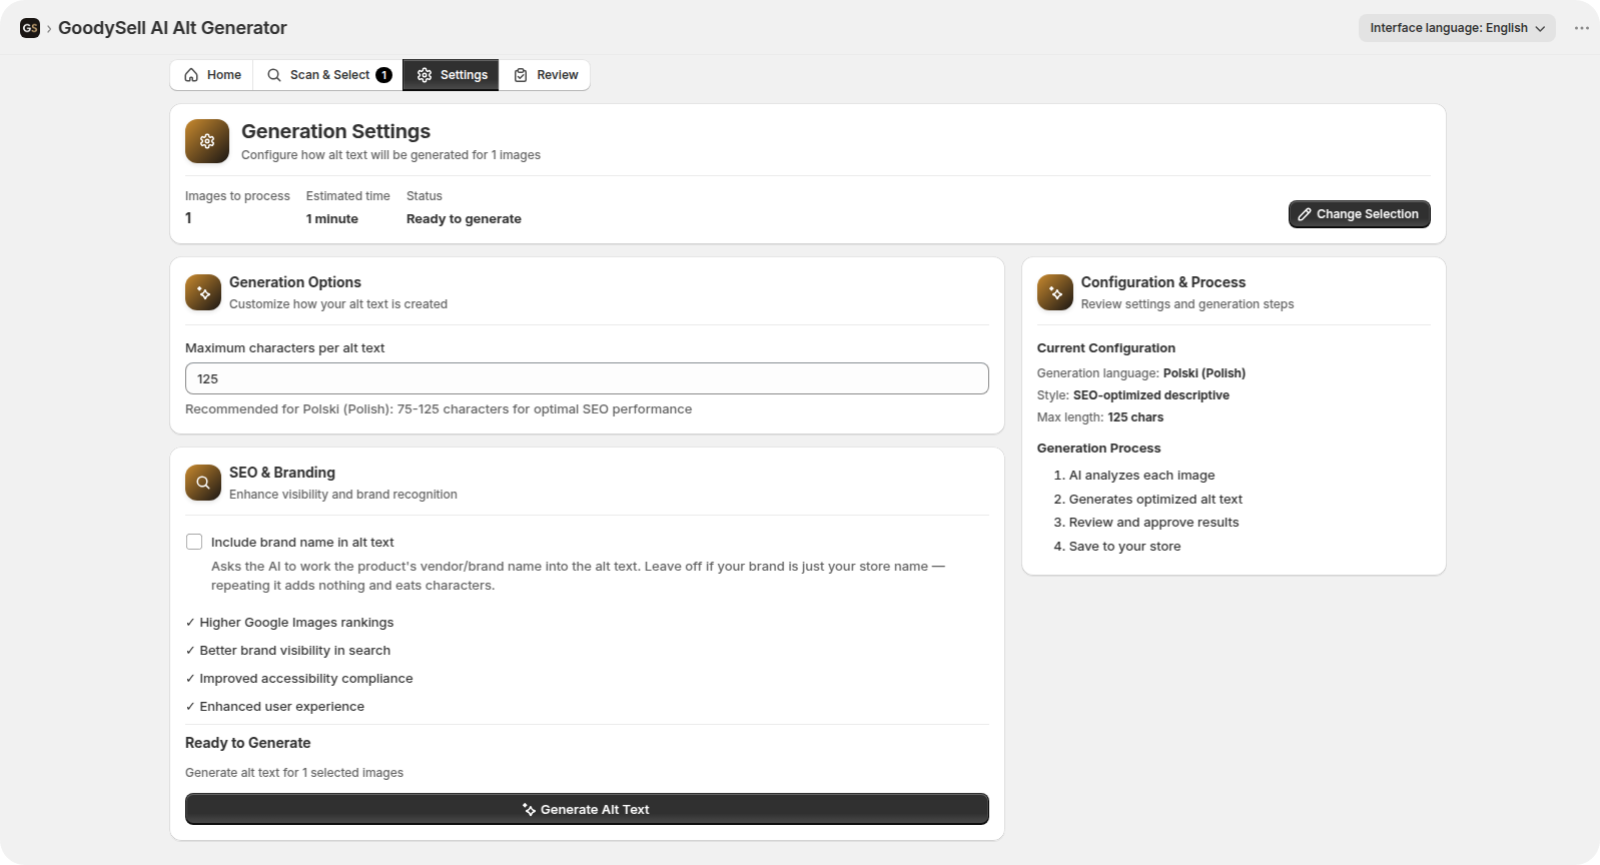
The Settings tab opens with a summary: how many images you're about to process, the estimated time, and a Change Selection button back to the gallery.
There are two settings.
Maximum characters per alt text
The default is 125 characters for Latin-script languages, with an allowed range of 75–125; the field shows the recommended range for whichever language you picked. Dense scripts get their own ranges, because their characters carry about twice as much content each:
Language | Range |
|---|---|
Latin-script languages | 75–125 |
Chinese (Simplified, Traditional) | 35–65 |
Japanese | 40–65 |
Korean | 45–70 |
Switch language and the field snaps back into that language's range automatically, so you can't accidentally ask for a 125-character Japanese description. This is the part that a single global character limit gets wrong: the same sentence in Japanese and in German simply doesn't need the same budget.
Include brand name in alt text
Optional, and off by default. When on, the AI works the product's vendor into the description. Leave it off when your vendor name is just your store name — repeating it in every description spends characters without telling anyone anything new.
The side panel repeats your configuration — generation language, style, max length — along with the four steps ahead. Then click Generate Alt Text.
Step 4: Generation
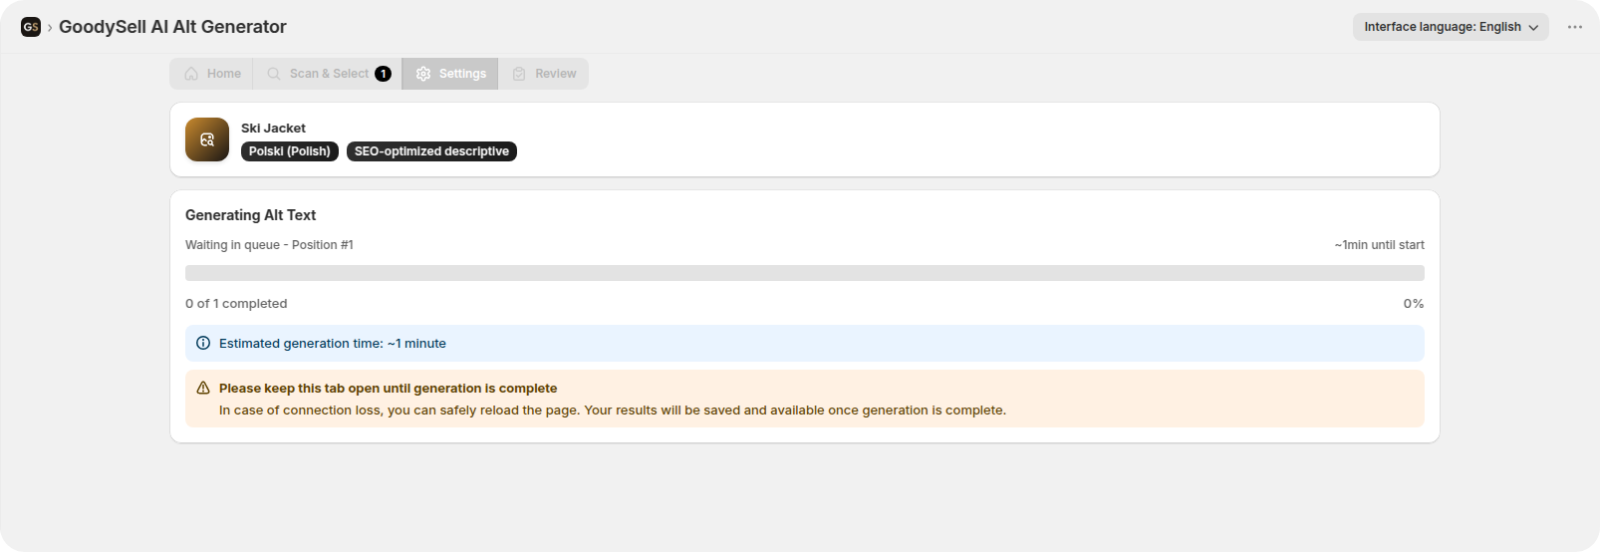
A progress screen shows a live count and percentage. For each image the AI looks at the photo itself plus the product title — and the vendor, if you enabled that — and describes the colors, materials and visual details a shopper would care about.
The screen tells you what to expect before it starts: an estimated generation time for your batch, and, if other stores are generating at the same time, your position in the queue and how long until yours begins.
Keep the tab open while it runs. If the connection drops anyway, nothing is lost — results are stored as they're produced, and reloading brings you back to them.
Step 5: Review before anything goes live
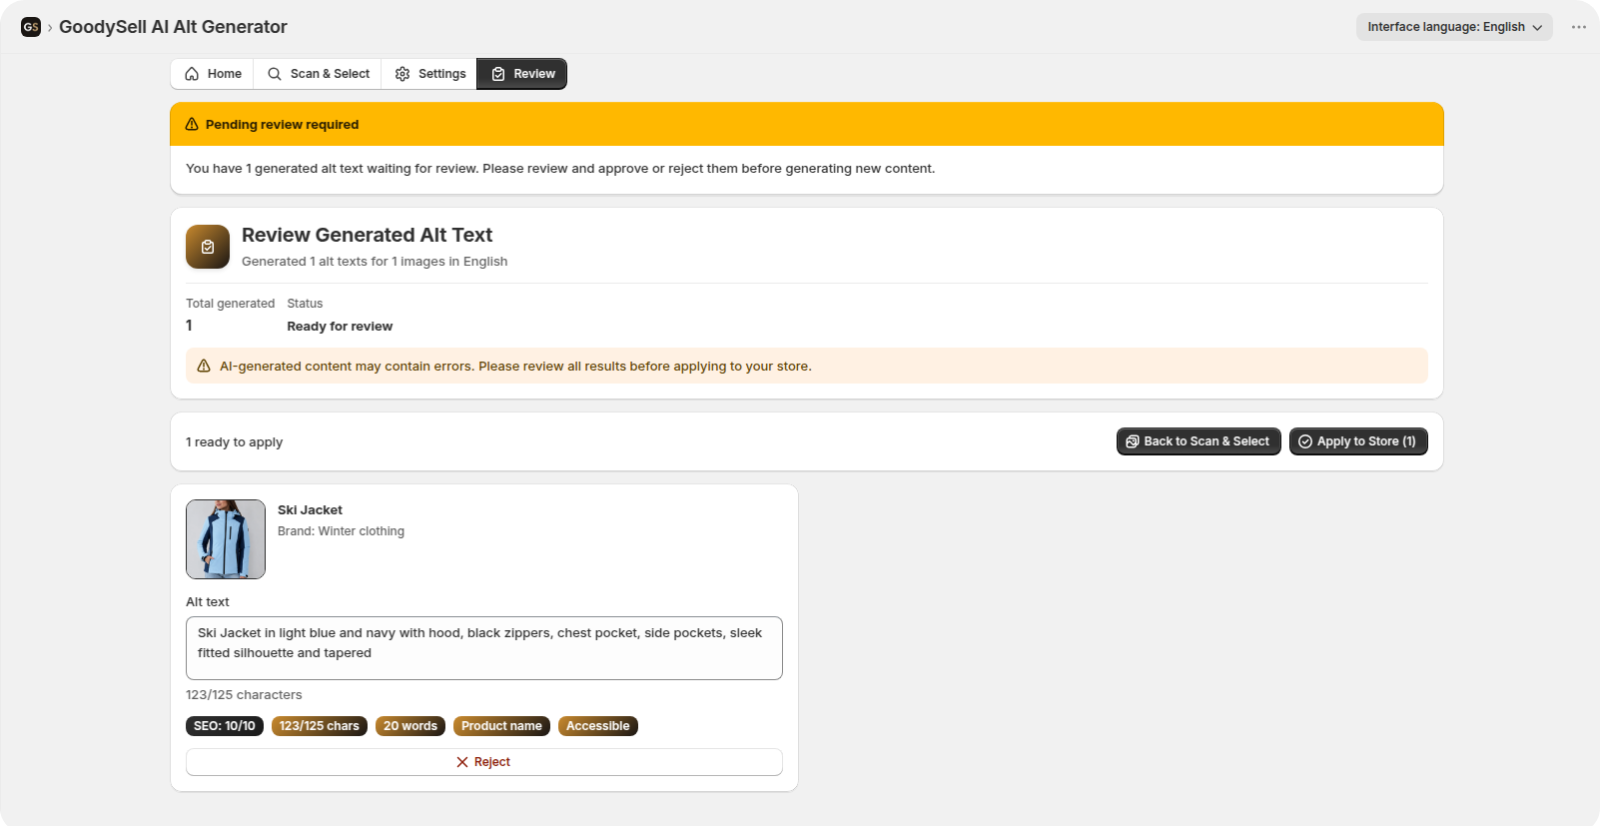
When generation finishes you land on the Review tab, with a banner telling you a batch is waiting. Nothing has touched your store yet.
Each card shows:
the image thumbnail, the product name and the brand
the generated alt text, editable in place
character count against your limit, and a word count
an SEO score out of 10, plus badges for whether the product name is included and whether the text meets accessibility expectations
The page also carries a standing reminder that AI-generated content can contain errors. Read through the results. They're good most of the time, and a quick pass catches the occasional oddity — which is exactly why the app puts the text in front of you instead of writing it straight to your products.
Don't like one? Reject it. Before you can apply anything, the app asks you to Confirm Rejections, which deletes those texts permanently; the images stay untouched and you can generate for them again later. Clear Rejections undoes your rejections instead. If you reject everything, the app tells you there'll be nothing left to apply.
While generated results are waiting, the banner blocks new generation until you've dealt with them — deliberately, so a second batch can't bury the first.
What a good result looks like
Before: empty, or product image
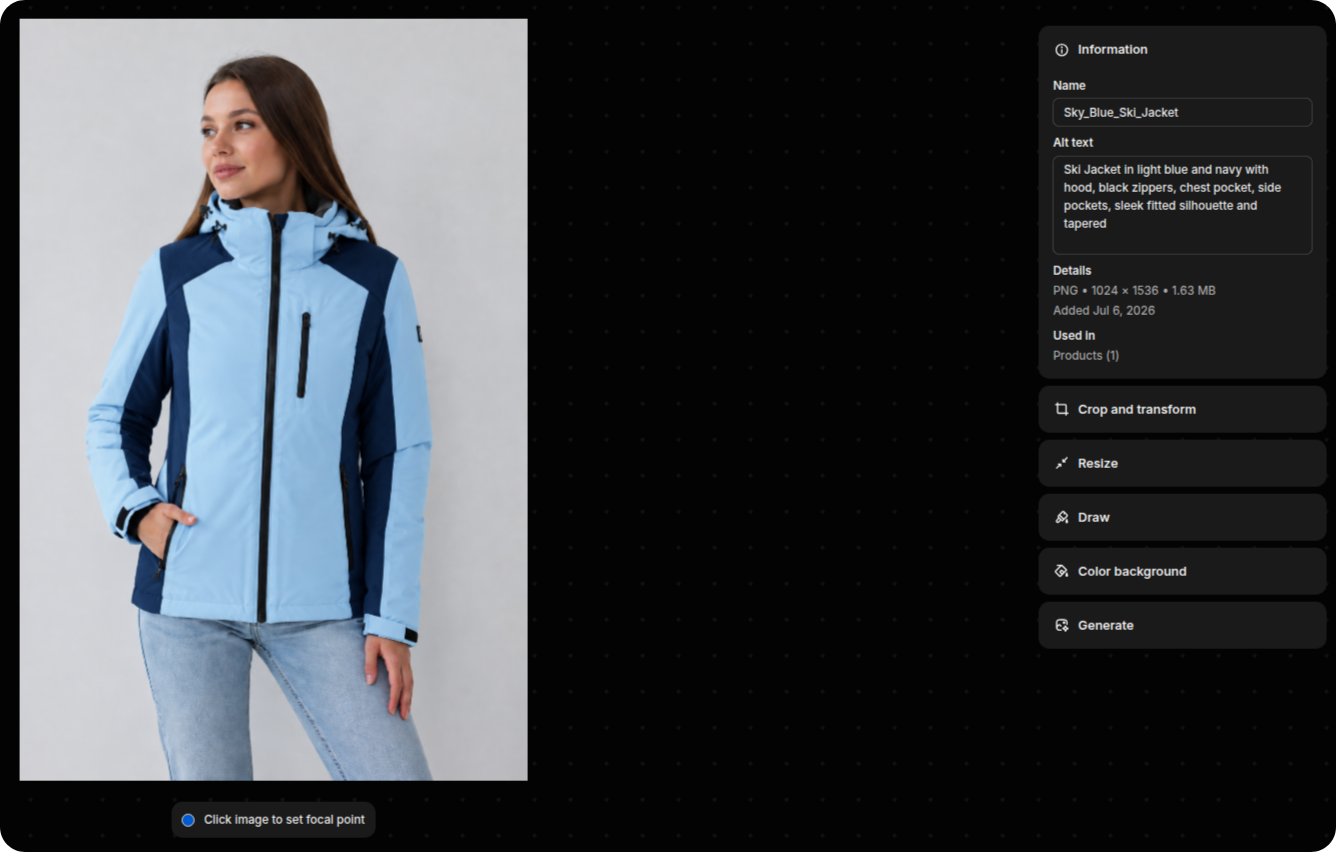
After: "Ski Jacket in light blue and navy with hood, black zippers, chest pocket, side pockets, sleek fitted silhouette and tapered"
That's an actual result from the Review tab: 123 characters against a 125 limit, 20 words, scored 10/10 and flagged Accessible. It names the product, both colors, and the details someone would actually search for — a hood, the zippers, a chest pocket, side pockets, the cut. Product, colors, features, silhouette, inside the character budget: that's what both Google and a screen reader need.
It also shows why the review step matters. The description runs right up against the limit and stops mid-phrase on "and tapered". One click into the field, delete the last two words, and it ends cleanly — the kind of ten-second fix that's much easier to make here than after it's live.
Step 6: Apply to your store
Click Apply to Store — the count on the button tells you how many descriptions are about to be saved. You'll get a confirmation, the scan statistics refresh, and you're returned to Scan & Select ready for the next round. If any individual save fails, the app reports how many applied and how many didn't, and keeps the failures on the Review tab so you can retry them.
Then pick the next language and repeat — that's the whole loop. Where the text lands, though, depends on the language, and so does where you go to read it back.
Where to check the alt text after you apply it
The app writes to two different places in Shopify depending on the language, so there are two different places to verify the result. This trips people up on multilingual stores, so it's worth spelling out.
Your primary language: on the image itself
For your store's primary language the alt text is written straight onto the image file. To see it: Products → open the product → click the image in the Media section. The image's details panel shows the Alt text field with the new description in it. That's the same field you'd type into by hand, so anything else that reads alt text — Google, screen readers, your theme — picks it up immediately.
Other languages: not where you'd expect
For every non-primary language the text is saved as a Shopify translation of the image's alt text — the alt key on the media resource, which Shopify made translatable in API version 2025-10. It sits alongside your primary alt text rather than replacing it, which is exactly what you want: German shoppers get German, English shoppers get English, from the same image.
The catch is that Shopify's Translate & Adapt app doesn't show it. That app covers theme content and metafield media; product gallery alt text isn't in its list, so don't go looking there and conclude nothing was saved. Three places do show it:
1. Back in this app — the quickest check. Open Scan & Select, pick the language in the Generation language dropdown, and switch to the Has Alt filter. Every card prints the alt text stored for that language, with its character count. The Have Alt Text and Accessibility Coverage figures at the top are also per-language, so a jump in coverage right after applying is your confirmation that the whole batch landed.
2. Your live storefront in that locale. Open a product page on the localized domain or language path, right-click the product image and choose Inspect. The alt attribute carries the translated text — as long as your theme outputs the image's alt attribute, which every Online Store 2.0 theme does. This is the most honest check available, because it's literally the markup Google and screen readers receive.
3. The Admin API, if you're technical. In a GraphQL client against your store:
graphql
query {
  translatableResource(resourceId: "gid://shopify/MediaImage/123456789") {
    translations(locale: "de") {
      key
      value
    }
  }
}
A row with key: "alt" and your generated text is the authoritative answer.
If a language looks empty in all three places, check that you actually applied that batch — results sitting on the Review tab are stored in the app but haven't reached Shopify yet.
Tips for better results
Feed it good photos. The AI describes what it can actually see; blurry or badly lit shots produce vaguer text.
Do one language per pass. Scan, generate, apply, then switch language and go again.
Keep the recommended length for the language. It's there for a reason, and overriding it is how you end up with padded or truncated text.
Skim before applying. A minute of reading beats a wrong description on a bestseller.
Cover variant images too. Different colorways need their own descriptions — that's half the point.
Use the Has Alt filter. It's the fastest way to replace old generic text you wrote years ago.
Rescan monthly. New products arrive with empty alt text; the coverage percentage tells you when it's worth a pass.
Watching your usage
The Current Plan card on Home shows your plan, how many images you've used against your monthly limit, and the date the limit resets. Go over it and the card shows a Limit Exceeded badge, and generation is refused until the period rolls over or you upgrade. The app also refuses a batch larger than the images you have left, rather than starting one it can't finish.
FAQ
Does it overwrite alt text I already have?
Only if you choose to. The default filter is Missing Alt; existing text is replaced only for images you deliberately select under the Has Alt tab.
How many images can I do at once?
100 per batch. Repeat for larger catalogs.
Which languages are supported?
Twenty for generation: English, German, Spanish, French, Italian, Dutch, Portuguese (BR/PT), Polish, Czech, Swedish, Danish, Norwegian, Finnish, Turkish, Malay, Japanese, Korean and Chinese (Simplified/Traditional). The dropdown shows the ones your store publishes.
Does it handle multilingual stores properly?
Yes. Non-primary languages are saved as Shopify translations of the image's alt text, which is where Shopify expects localized alt text to live. Note that Translate & Adapt doesn't display product image alt text — check it in the app under the Has Alt filter for that language, or in the page source on your localized storefront.
Can I edit the generated text?
Every result is editable on the Review tab before you apply it, and you can reject any you don't want.
What if I close the tab during generation?
Results are saved as they're generated. Reload the app and you'll find them waiting on the Review tab.
How long does it take?
The app shows an estimate for your batch before it starts, along with your queue position if there is one.
Wrapping up
Alt text has always been an easy SEO and accessibility win that loses to the clock. Doing it with AI turns an afternoon of typing into a scan, a skim and a click — with a review step so nothing reaches your storefront that you haven't seen.
Install GoodySell AI Alt Generator from the Shopify App Store, try it on a few images first, and check the coverage number on your next scan.